Authentic Japanese Custard Pudding (Purin) Explained
Discover the authentic Japanese custard pudding (purin) recipe and learn how to make this creamy dessert at home with our step-by-step guide.
19 min read
There are recipes that taste like home. I still remember the first time I heard the wobble of a perfectly set custard and the soft, bittersweet scent of caramel filling the kitchen. That small moment made a simple dessert feel like a warm memory.
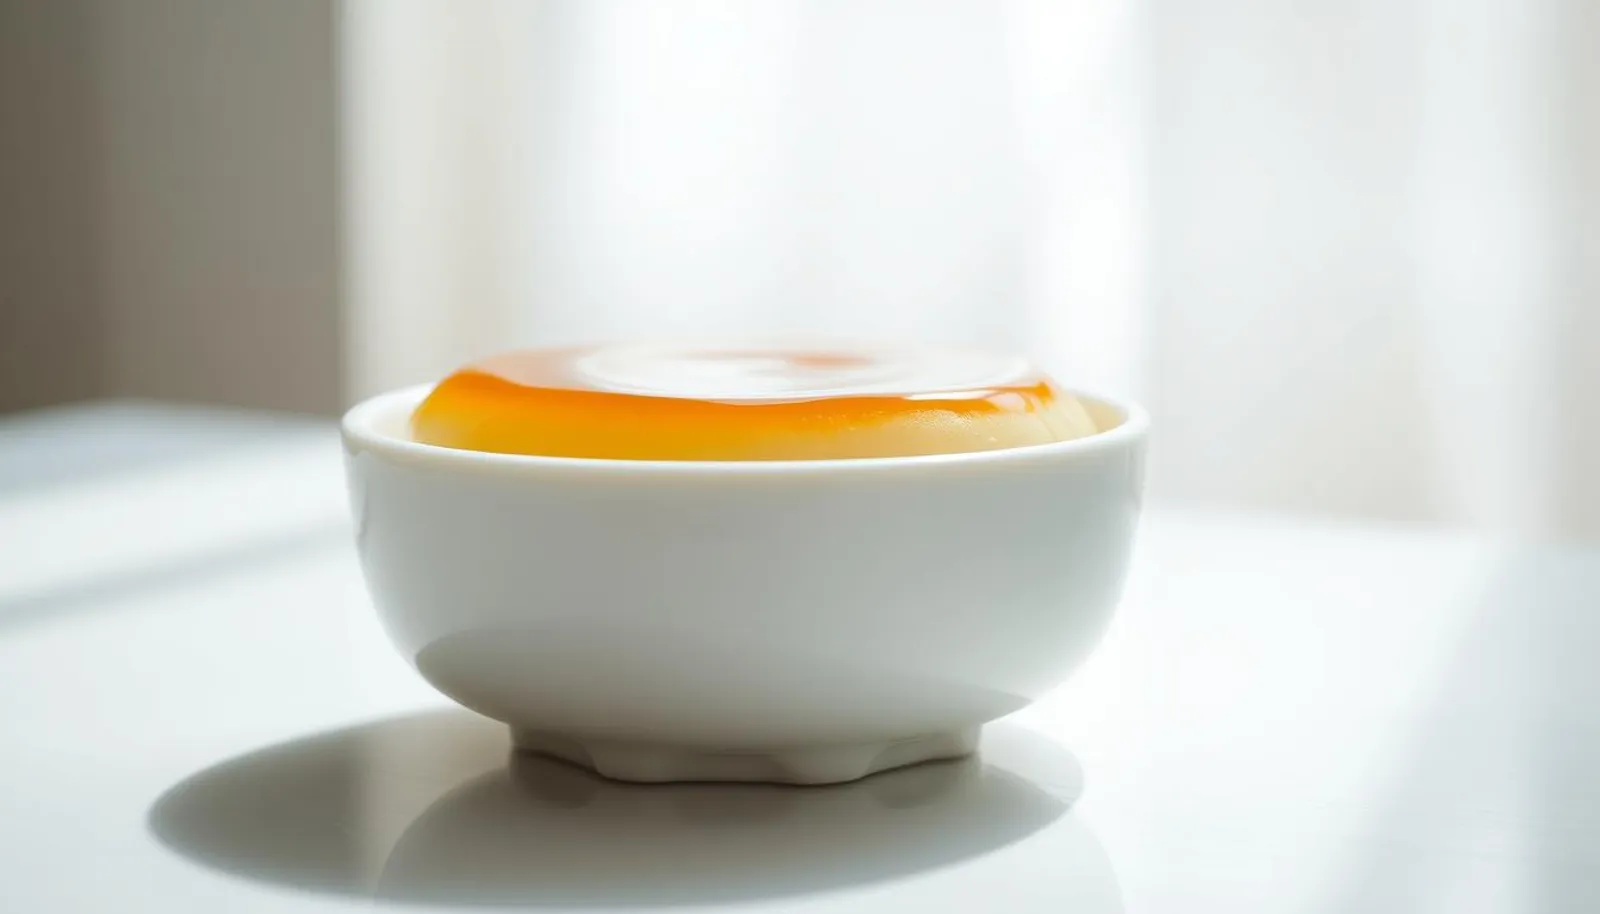
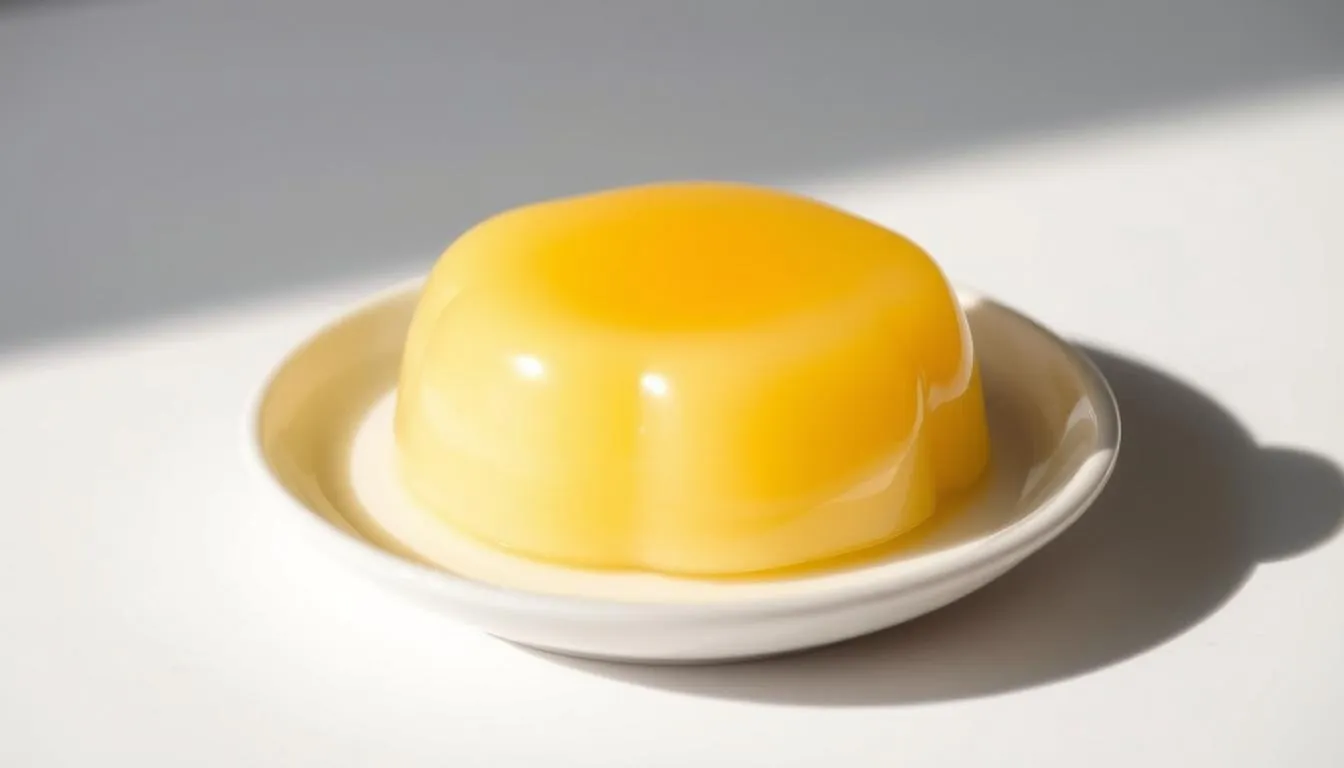
Purin is a beloved custard dessert of eggs, milk, and sugar topped with a thin layer of bittersweet caramel. It sits between flan and crème caramel: firm enough to unmold, with a gentle jiggle and a deeper caramel flavor that balances sweetness.
This guide breaks down ingredients and tools, then walks you through making caramel, tempering eggs, baking in a water bath, steaming, using an Instant Pot, and a no-bake gelatin option. You’ll get clear visual cues and small technical tips that save time and prevent common mistakes.
With simple staples—milk, sugar, eggs, vanilla—and a few pans and ramekins, you can make this dessert at home for a weeknight treat or a special occasion. Expect pro tips on texture, timing, and serving so your slices shine with cascading sauce.
Key Takeaways
- Classic purin blends silky custard with a glossy caramel finishing sauce.
- Texture aims: firm but gently jiggly, similar to flan or crème caramel.
- Learn techniques for caramel color, tempering, and water-bath baking.
- Simple ingredients and basic tools deliver reliable results at home.
- Small cues—caramel shade, custard jiggle—prevent common errors.
- Options include baked, steamed, Instant Pot, and no-bake versions.
What Is Purin? The Japanese Take on Crème Caramel
Purin is the local expression of crème caramel: a softly set dessert made from milk, sugar, and eggs, finished with a thin, glossy caramel sauce.
Texture and flavor — how it differs
Signature texture: smooth and silky, firm enough to unmold yet wobbly when shaken. Each spoonful feels lush but light.
The flavor leans mild; the caramel adds bittersweet depth that balances sweetness without overpowering the base.
How it compares to flan and crème brûlée
Flan shares the same concept, but this version often reads as silkier and more refined on the plate.
Crème brûlée has a similar interior, yet it is defined by a burnt-sugar crust that this dessert does not have.
“A simple mix of milk, sugar, and eggs becomes both nostalgic and elegant when handled with gentle heat.”
- Origins: introduced during the Meiji era and popularized by mid-20th century cafés and shops.
- Two main styles today: baked or steamed custard, and gelatin-set, no‑bake cups found in stores.
- Modern reach: from convenience-store cups to café plates, with seasonal flavors like matcha and chocolate.
Why it matters: this dessert sits comfortably in home kitchens and upscale cafés alike. With gentle heat control and a few visual cues, you can reproduce café-level texture at home.
Key Ingredients for Silky Purin
A silky finish comes from a small set of well‑chosen ingredients and gentle technique. Gather fresh staples and measure carefully before you begin.
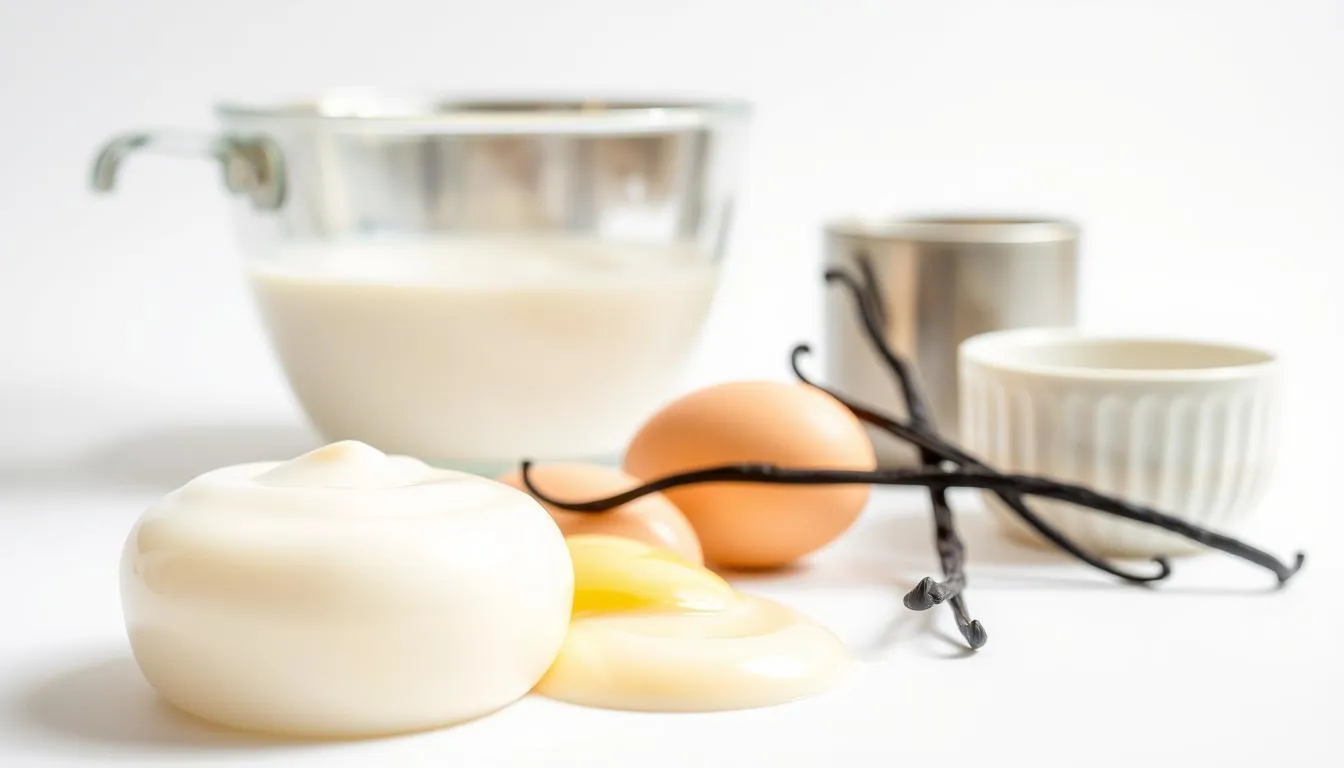
Eggs, sugar, milk, plus optional cream and vanilla
Eggs set the base: whites give structure while yolks add richness and color. Some recipes add an extra yolk for deeper hue and body.
Use granulated sugar for both the base and the caramel — it dissolves cleanly and caramelizes predictably.
Milk provides body. A splash of cream or a scrape of vanilla boosts silkiness and aroma without complicating the method.
Why whole milk and fat content matter
Whole milk delivers more fat, which improves mouthfeel and helps the custard hold its shape while staying smooth. Less fat yields a lighter, jigglier result.
Adjust the egg‑to‑milk ratio to change richness: more yolk or cream equals denser texture; more milk keeps it tender. Use high‑quality eggs and dairy — this simple recipe shows every flavor.
“Precision and gentle handling matter more than fancy ingredients.”
Tools, Molds, and Oven Setup
Choosing the correct cups and arranging a steady bain‑marie makes the difference between a firm slice and a silky wobble. This brief setup helps you match mold material to the texture you want and keeps heat even during the full bake time.
Which molds to use
Aluminum conducts heat fastest and usually yields a slightly firmer set. Use it when you want a denser finish.
Stainless and heat‑resistant glass warm more slowly, giving a softer, silkier result. Ceramic ramekins are thick and often need extra oven time.
Ideal capacities run from 120–220 ml. Smaller cups are great for kids or tasting flights; 150–220 ml is a classic café portion.
Bain‑marie basics and oven tips
- Place molds in a rimmed baking pan at least 2 inches deep.
- Add hot water to reach halfway up the molds’ sides for gentle, even cooking.
- Preheat the oven to 300°F (150°C) and use hot water so cooking begins evenly.
- Set the water-filled pan on a baking sheet for safer transfer and to catch spills.
- Check for air pockets beneath molds and level the pan to keep a smooth top.
Safety and small tips: use a hot plate gripper or sturdy tongs to lift warm molds. Match mold shape to how much thin caramel you want — cup width changes sauce ratio. An even water level stops outer molds from overcooking and inner ones from lagging behind.
Making Caramel: Color, Bitterness, and Control
Making caramel is a short, focused process that rewards patience and attention. Use a heavy-bottomed saucepan so the color changes remain visible and heat distributes evenly.
“Watch the edges, not the spoon.” Combine sugar with a splash of water and place over heat medium. Do not stir; instead, swirl the pan as the syrup cooks. Tiny bubbles will grow and the shade will move from pale to amber.
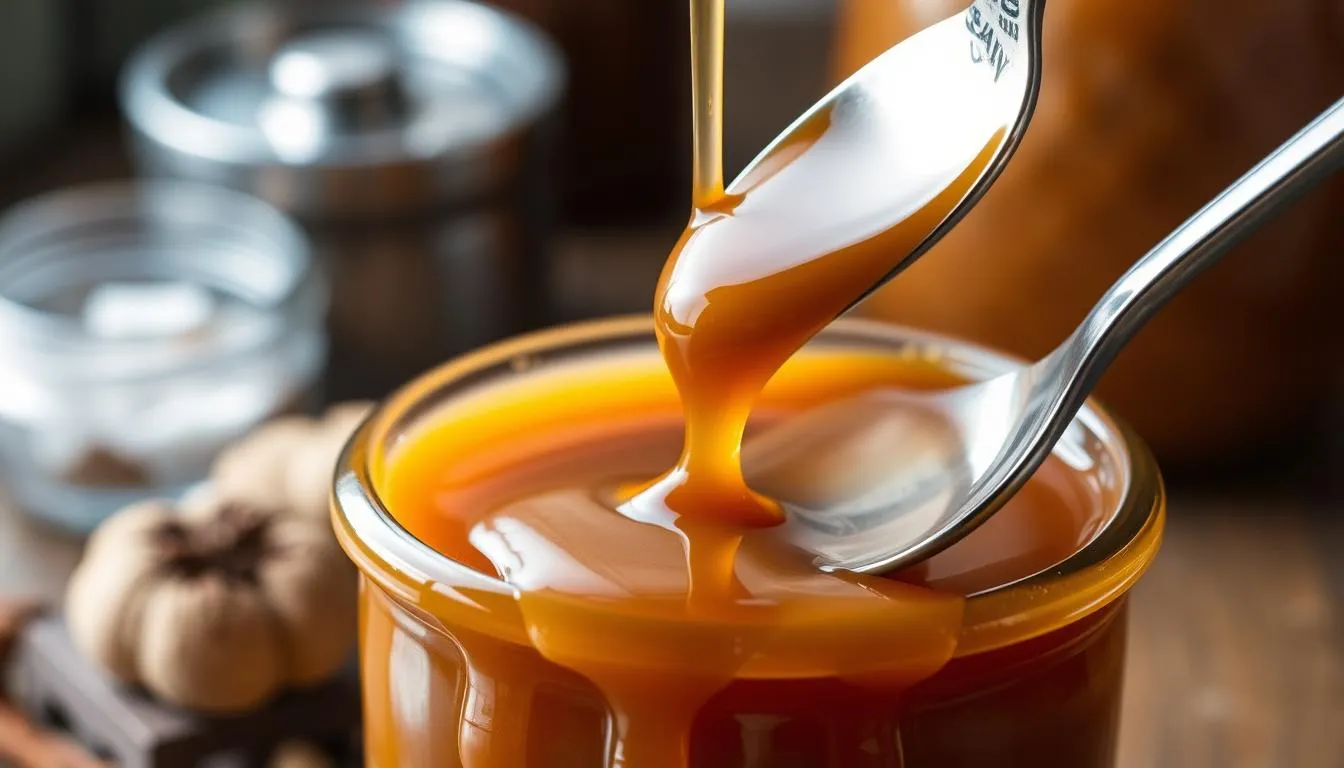
Do not stir: swirl and around edge cues
Stirring invites crystallization. Gently tilt and rotate the pan so the syrup darkens evenly around edge and center. Stop when it reaches deep amber and just begins to smoke—it will darken a little off the heat.
Adding hot water safely to thin the caramel
Turn off the burner, then add hot water carefully; expect sputtering. Swirl the mixture to combine and pour immediately into molds for a thin, 1/8-inch base. Let it cool and set aside.
Common caramel mistakes to avoid
- Do not stir with a spoon—this causes crystals.
- Don’t rush the time—pale syrup yields flat sweetness.
- If the mixture hardens, add milk and reheat to make a caramel milk rescue.
Heat Milk, Temper Eggs: Building a Lump‑Free Custard
Gentle heat and steady hands make the difference. Heat milk with a splash of cream and a vanilla scrape on heat medium until small bubbles form at the pan edge, then turn the heat off. That soft cue tells you the dairy is hot enough but not scalding.
Beat eggs with sugar in a bowl until smooth. To temper, whisk constantly while adding a ladle of hot milk to the egg mix. Repeat slowly until the full mixture is combined and even.
Strain the blend through a fine sieve to remove any cooked bits and ensure an ultra-smooth top. Skim or clear surface bubbles by passing a long-stem lighter quickly over the surface or popping them with a toothpick.
- Keep dairy below a simmer: scalding causes a cooked‑egg flavor and risks curdling.
- Pour gently: use a spouted cup to avoid aerating the mixture before it hits the molds.
- Work efficiently: stove → bowl → sieve → molds keeps temperatures steady and the custard uniform.
“Temper slowly—one ladle at a time—to protect texture and keep the custard silky.”
For a tested step‑by‑step, try this classic recipe to follow the bake and finish stages with confidence.
Japanese custard pudding (purin): Step‑by‑Step Baking Guide
Start by preheating the oven and arranging a steady water bath—this step sets the stage for an even bake. Preheat to 300ºF (150ºC) and warm a rimmed pan so the transfer is smooth.
Place filled molds in a 2-inch-deep pan and pour hot water until it reaches halfway up the sides. This stabilizes oven swings and protects the soft custard from direct heat.
Plan the bake time: 35–45 minutes for 150–220 ml molds. Thicker ceramic cups often need 45–60 minutes. Use hot water that’s not at a rolling boil to avoid violent bubbling.
How to check doneness
Use the jiggle test: the surface should wobble slightly but not look liquid. Nudge the mold; if the center does not flow, the set is correct.
Use the tilt method to confirm. If the mixture moves like a pool, give it a few more minutes. When it passes the jiggle test, turn heat off so residual warmth finishes the set and you avoid “su” holes.
- Remove molds carefully with tongs and cool on a rack to room temperature.
- Keep the pan level during moves to maintain a flat top.
- Chill 2–3 hours before unmolding—this firms the texture and improves sauce coverage.
“A gentle water bath and patient timing make the difference between a soft wobble and a perfect, sliceable finish.”
Alternative Cooking Methods: Stovetop Steaming and Instant Pot
When you skip the oven, gentle steam or a pressure cooker delivers even heat and a smooth finish.
Stovetop bain‑marie is close to the oven technique but needs a simple trick. Set filled molds in a wide pan and add hot water to reach halfway up the sides. Wrap the lid with a clean tea towel to catch drips and keep condensation off the surface.
Maintain a quiet simmer on low. Cook about 10 minutes, then turn heat off and keep covered for another 10 minutes. Use the tilt test to check doneness and return to low heat briefly if the center still looks loose.
Steaming tips and straight steam timing
For plain steaming, leave the lid slightly ajar so steam can escape. Keep heat low to avoid overcooking and “su” holes. Expect 15–20 minutes for small cups; larger molds need more time.
Instant Pot timing and release
In an Instant Pot, pour 1 cup of water into the base and set ramekins on the trivet. Cover cups loosely with foil to limit surface water. Cook at high pressure for 12 minutes and allow a full natural release to prevent bubbles or cracked tops.
Lift cups carefully, cool on a rack, then refrigerate until completely chilled. These methods work when the oven is not an option, but gentle, controlled heat remains the key to a creamy finish.
| Method | Typical time | Key advantage |
|---|---|---|
| Stovetop bain‑marie | 10 min simmer + 10 min rest | Low, even heat; towel prevents drip |
| Straight steaming | 15–20 min (small cups) | Fast and oven-free; watch temp closely |
| Instant Pot | 12 min high pressure + natural release | Reliable timing; great for consistent sets |
| Cooling step | Chill fully before unmolding | Firms texture and cleans sauce coverage |
No‑Bake Gelatin Purin for a Wobbly, Jello‑Like Finish
For a quick, make-ahead treat, try a gelatin-set version that chills into glossy, wobbly cups while keeping a rich dairy flavor.
Bloom gelatin in cool milk with the sugar so granules hydrate evenly. Gently warm the mix to about 60–70°C (140–160°F) to dissolve the gel completely. Do not exceed 75°C; overheating weakens the set.
Optionally whisk in beaten eggs, a splash of cream, and a little vanilla for extra silk and aroma. Strain the base to remove any bits, then pour into 100–150 ml cups.
Cover and chill for at least 3 hours, preferably overnight, so the gel bonds fully. The result is a smooth, wobble-forward pudding with a clean dairy taste and a soft jiggle.
- Keep fat balanced: a touch of cream lifts mouthfeel without making the set heavy.
- Flavor ideas: whisk matcha, coffee, or cocoa into the warm dairy before straining.
- This method mirrors many store-bought purin cups and is ideal for no-heat entertaining.
Troubleshooting Texture, Bubbles, and “Su” Holes
Small heat mistakes show up quickly as holes, bubbles, or a grainy texture—here’s how to spot and fix them.
Overheating signs: a honeycomb interior—known as “su” holes—means the mix boiled or was exposed to violent steam. The color will deepen and the mouthfeel turns grainy when eggs overcook.
How to prevent and fix honeycomb textures
- Identify “su” holes: honeycomb gaps signal the custard boiled from too-high oven or steam.
- Prevent by keeping a gentle water bath; the water should reach halfway up the molds so heat stays even.
- If overcooked: expect firmer, grainier texture. It’s still edible—use as a spooned dessert or blend into a sauce.
Stopping bubbles on top and inside
Pop surface bubbles with a long-stem lighter or skim them before baking to avoid pockmarked tops. Avoid whipping milk and eggs too vigorously; trapped air turns into bubbles during cooking.
| Issue | Cause | Quick fix |
|---|---|---|
| “Su” holes | Too-high heat; boiling water or steam | Lower oven temp; use hot preheated water and more gentle simmer |
| Top bubbles | Air in mix or violent steam | Strain base; pop bubbles with lighter before bake |
| Under-set center | Short cooking time | Extend time in small increments; use jiggle test |
“Keep the water calm and the heat low—gentle, even warmth gives the smoothest set.”
Final tips: keep the oven door closed for steady humidity, preheat the water in your pan, and strain the base to remove micro-lumps. These small steps protect texture and cut down on bubbles and surface flaws.
Serving, Unmolding, and Toppings
When it’s time to serve, small steps turn a set ramekin into a glossy, show-stopping plate. A calm, confident flip reveals the sauce and keeps slices neat.
Run a thin knife or an offset spatula around the rim to break the seal. This eases unmolding and lets the caramel flow cleanly when inverted.
Run a knife, flip, and let the sauce cascade
Place a small plate over the cup, flip decisively, then lift the mold straight up. If the cup resists, pat the sides gently to release suction.
Warm the outside of a thick cup with your palm for a few seconds if the caramel is stubborn. Serve well-chilled for the best texture and the cleanest slices.
Whipped cream, cherries, and home‑cafe presentation
Finish each portion with softly whipped cream and a bright cherry for a nostalgic home café look. Add a few vanilla bean specks or a mint sprig for color and aroma.
- Choose rimmed plates to catch extra sauce.
- Unmold just before serving at gatherings so the top stays glossy.
- Keep napkins and small spoons ready—this dessert invites saucy enjoyment.
“A decisive flip and a soft dollop of cream turn simple cups into café-ready treats.”
For a visual refresher and the classic caramel technique, check the linked recipe before your next dinner. These tips make each plate look deliberate and delicious.
Storage, Make‑Ahead, and Ingredient Swaps
How you store and swap ingredients affects texture and flavor more than you might expect. Plan at least a few hours for chilling and choose swaps that suit the final mouthfeel you want at home.
Chill time, fridge life, and why not to freeze baked sets
Plan for chilling: allow 2–3 hours before unmolding so the sauce settles and the structure firms.
Refrigerate covered for about 3–4 days for best quality. Do not freeze baked or steamed cups; freezing breaks the delicate protein and fat network and causes weeping and a mealy texture.
Dairy swaps, sugar tweaks, and flavor ideas
Alternative milk like soy, almond, or oat works, but whole milk gives more fat and a richer mouthfeel. A splash of cream raises silkiness—balance it by gentle cooking to keep the set intact.
You can trim sugar slightly or reduce the caramel, but keep enough sugar for proper set and balanced sweetness. Gelatin-based versions freeze and hold up better than baked ones if you need longer storage.
- Make sure molds are covered to avoid fridge odors and to keep tops glossy.
- Set aside unmolding until close to service for the best sauce appearance.
- Try vanilla, matcha, or coffee for quick flavor swaps; always strain before pouring.
“Chill patiently and choose your swaps wisely—small changes make a big difference to texture and taste.”
| Storage step | Time or advice | Why it matters |
|---|---|---|
| Chill before unmolding | 2–3 hours | Firms structure and improves caramel coverage |
| Refrigerate | 3–4 days | Best quality window; flavor and texture hold |
| Freezing (baked/steamed) | Not recommended | Damages texture; causes weeping on thaw |
| Gelatin version freezing | OK for longer storage | Gel network tolerates freezing better |
Conclusion
A reliable final result depends on holding even heat and reading three simple cues: color, bubble size, and the finishing jiggle.
Follow the tested steps: bake at 300ºF in a hot water bath, make caramel by swirling without stirring, heat milk until small edge bubbles appear, then temper and strain for an ultra-smooth base. Chill 2–3 hours before unmolding to set the sauce and texture.
Alternatives include stovetop steaming with a towel-wrapped lid or the Instant Pot (12 minutes high pressure, full natural release). Timing shifts with mold size and material, so use visual tests rather than the clock alone.
These techniques let you confidently make Japanese purin and related custard cups, vary richness with whole milk or a splash of cream, and add flavors like matcha or coffee. Practice builds intuition—each batch helps you refine how long to turn heat down, how dark to take the caramel, and when to rest so your pudding looks glossy, delicate, and balanced.
FAQ
What makes authentic Japanese custard different from flan or crème brûlée?
The dessert here is silkier and more wobbly than flan and much less firm than crème brûlée. It uses a simple custard base of eggs and whole milk, sometimes a touch of cream, then bakes gently in a water bath for a smooth, tender texture and a glossy top.
Which ingredients are essential for a silky result?
Use fresh eggs, granulated sugar, and full‑fat whole milk; a splash of heavy cream or real vanilla improves flavor and mouthfeel. Fat content matters: higher fat gives a richer, creamier mouthfeel and helps prevent graininess.
What molds and equipment work best?
Ramekins or small ceramic or glass cups are ideal. If using metal, choose stainless or aluminum. For even baking, set molds in a deep roasting pan for a bain‑marie and pour hot water about halfway up the sides of the cups.
How do I make caramel without burning it?
Melt sugar over medium heat and avoid stirring once it starts to color — gently swirl the pan instead. Watch the edge color closely; remove from heat when it reaches a deep amber and add a spoonful of hot water carefully to thin if needed.
When should I turn the heat down while heating milk?
Heat milk over medium and reduce to low as soon as small bubbles form around the edge and before it reaches a boil. This prevents scalding and keeps the custard from curdling when combined with eggs.
How do I temper eggs so the mixture stays lump‑free?
Whisk eggs and sugar, then slowly stream hot milk into the egg mix while whisking constantly. This equalizes temperatures and prevents cooked egg bits. Strain the custard through a fine sieve before pouring into molds for extra smoothness.
What oven temp and timing give the best set without overcooking?
Bake in a preheated oven around 325°F (160°C) in a water bath. Typical timing for small ramekins is 30–40 minutes; larger cups need more time. The custard is done when it gently wobbles in the center but is set at the edges.
How can I check doneness without cutting into the dessert?
Use the jiggle test: give the pan a gentle shake. The center should wobble slightly but not be liquid. Tilt a ramekin gently — if the center trembles as a single mass, it’s ready.
Can I steam this on the stovetop or use an Instant Pot?
Yes. For stovetop steaming, cover with a lid and wrap a towel to reduce condensation. In an Instant Pot, use the trivet and steam function with a natural release; reduce pressure and timing according to ramekin size to avoid overcooking.
How do I make a no‑bake, gelatin version for a more jiggly finish?
Bloom gelatin in cold water, then dissolve in warmed milk (not boiling). Mix with eggs or eggless ingredients per your recipe, pour into molds, and chill for several hours until fully set.
Why do holes or honeycomb textures form, and how do I prevent them?
Overheating or whisking too vigorously traps air or causes the proteins to tighten and expel moisture, creating holes. Reduce heat, strain the mixture, and pour gently into molds to prevent bubbles and honeycomb textures.
How do I prevent bubbles from appearing on the surface?
Strain the custard, then skim any foam from the top before pouring. Tap molds lightly on the counter to release trapped air and bake in a water bath to moderate temperature changes that create bubbles.
What’s the best way to unmold and serve with the caramel sauce?
Run a thin knife around the edge, invert onto a serving plate, and let the caramel cascade over the top. Serve chilled with a dollop of whipped cream or fresh berries for presentation.
How long can I store these desserts in the fridge and can I freeze them?
Store covered in the refrigerator for up to 3 days. Avoid freezing baked cups—the texture becomes grainy. For make‑ahead plans, bake and chill, then unmold just before serving.
Are there easy ingredient swaps for dairy or sugar adjustments?
You can use higher‑fat plant milks or half‑and‑half for a richer profile, but texture will vary. Reduce sugar slightly for a less sweet result and consider vanilla paste or extract for flavor without changing texture. For gelatin versions, sugar adjustments affect set time slightly.