Takoyaki Octopus Balls: The Ultimate Street Food Experience
Discover the art of making takoyaki octopus balls with our step-by-step guide. Learn the secrets to this popular Japanese street food.
18 min read
I still remember the first time I walked up to a sizzling stall in Osaka — the air full of savory steam, the crowd smiling as tiny rounds flipped and browned.
That moment made me fall in love with a simple street food treat: little round bites with a crisp shell and custardy center.
At home, you can recreate that theater with a molded pan, a thin dashi-forward batter, and pantry staples like flour and eggs mixed in a bowl. Fillings such as cooked octopus, pickled ginger, green onion, and tenkasu add chew, zing, freshness, and crunch.
This short guide walks you through the tools, the batter, and flipping techniques so you get golden, evenly cooked fried octopus balls that taste like the stall version. Expect hands-on time in minutes per batch and a total flow that fits weeknights or weekend projects.
Whether you start with a premade mix or a scratch recipe, small adjustments and a steady wrist deliver fun, shareable snack results.
Key Takeaways
- Osaka’s iconic street food offers a crispy exterior and gooey interior that’s perfect for sharing.
- A molded pan matters for even browning and round shape.
- Basic ingredients—dashi, flour, eggs, soy—come together in one bowl.
- Fillings and toppings add texture and umami without fuss.
- Hands-on minutes per batch make this doable for weeknights or parties.
What Are Takoyaki Octopus Balls? A Friendly Intro for First-Timers
Imagine a hot, round snack flipped on a griddle while steam and savory scent rise into the air.
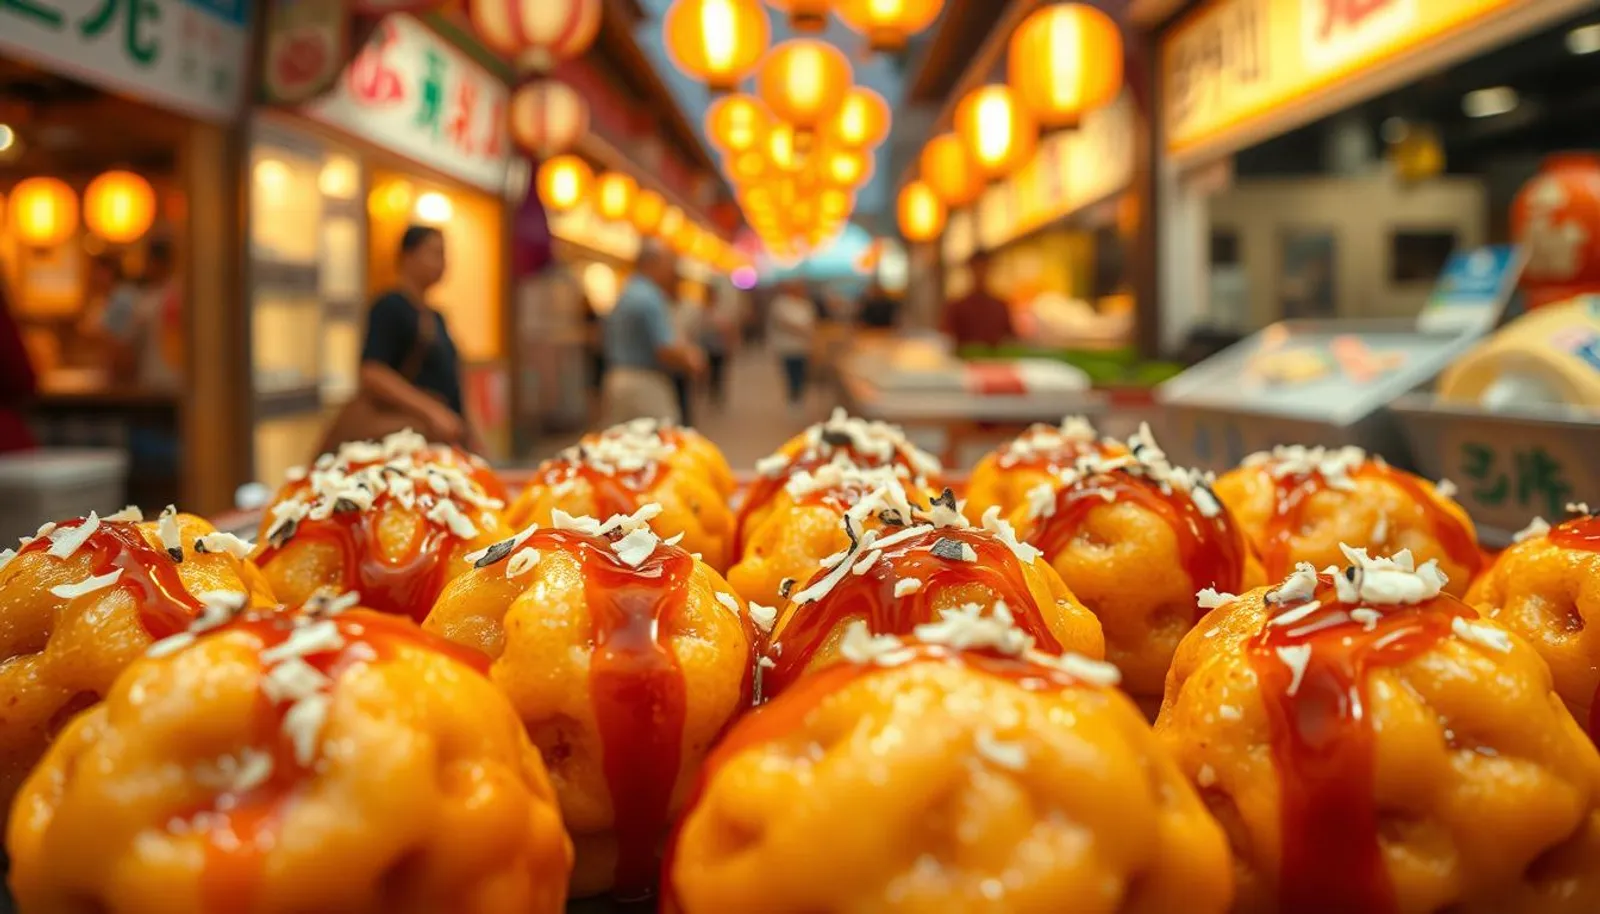
Takoyaki literally means “octopus grilled/fried.” It points to the classic filling and to how fast the treat cooks at street stalls across Japan. These bite-size rounds are sold at yatai, convenience stores, specialty shops, and restaurants.
The hallmark texture is a thin, crispy shell that gives way to a gooey, custard-like center. Inside you’ll find tender octopus pieces that are easy to chew.
Classic mix-ins include pickled ginger for a tangy pop, green onions for freshness, and tenkasu for crunch. Dashi in the batter adds deep umami and keeps the inside soft and flavorful.
- Vendors cook on large griddles, so the experience is hot and interactive.
- Bonito flakes often finish the top, fluttering in the heat for visual drama.
- Pre-cooked octopus pieces remove guesswork for home cooks.
Approachable for parties: the same method works with many fillings, so you can make crowd-pleasing variations if seafood isn’t your first choice.
From Osaka to Your Kitchen: A Brief History and Today’s Popularity
A 1930s Osaka street vendor turned a local eggy dumpling into a national favorite.
Origin story: In the 1930s Tomekichi Endo popularized what became known as takoyaki, adapting the regional akashiyaki. That egg-forward dumpling, often filled with octopus, inspired the soft, custardy interior we prize today.
The snack grew from Kansai lanes to a nationwide staple. Vendors at yatai, specialty shops, and even convenience stores sell it now. Festival stalls keep the lively street food tradition alive.
Home cooks joined the trend as specialty pans and pantry ingredients spread overseas. Dashi (a savory soup stock) and soy-based seasonings made the flavor profile familiar and comforting to many.
| Era | Key Change | Where to Find It |
|---|---|---|
| 1930s | Popularized by Tomekichi Endo; akashiyaki influence | Osaka street stalls |
| Post-war | Spread across Japan; regional styles emerge | Specialty restaurants |
| Today | Home pans, convenience stores, global availability | Yatai, shops, U.S. markets |
Why this matters: Knowing the roots and the simple, time-honored techniques—thin batter, staged flipping—helps cooks recreate the texture and flavor that made these balls beloved street food.
Essential Gear: Choosing the Right Takoyaki Pan and Handy Alternatives
A solid pan changes how the batter browns and how easily you flip each savory sphere.
Electric vs. stovetop cast-iron: Electric takoyaki pans offer steady heat and table-side fun, great for group nights. Stovetop cast-iron plates hold heat well and, when seasoned, release cleanly for a superior crust.
Preheat any pan thoroughly and brush each cavity with oil before you pour batter. A generous coating prevents sticking and helps create a crisp shell.
Can an aebleskiver pan work?
A Danish aebleskiver pan is a workable alternative. Its cavities are usually larger, so fill less and add a bit more time when you flip each ball.
U.S. buyer tips
Check outlet voltage and plug type when importing electric models. Brands like Iwatani make portable stovetop grill pans that are easy to find online or at Japanese markets.
“Heat control and consistent pour depth matter more than brand for great results.”
- Choose a pan size that fits your burner to avoid cold corners.
- Practice smooth turns with a skewer for round, even results.
- Nonstick coatings ease clean-up; cast iron rewards with durability and browning when cared for.
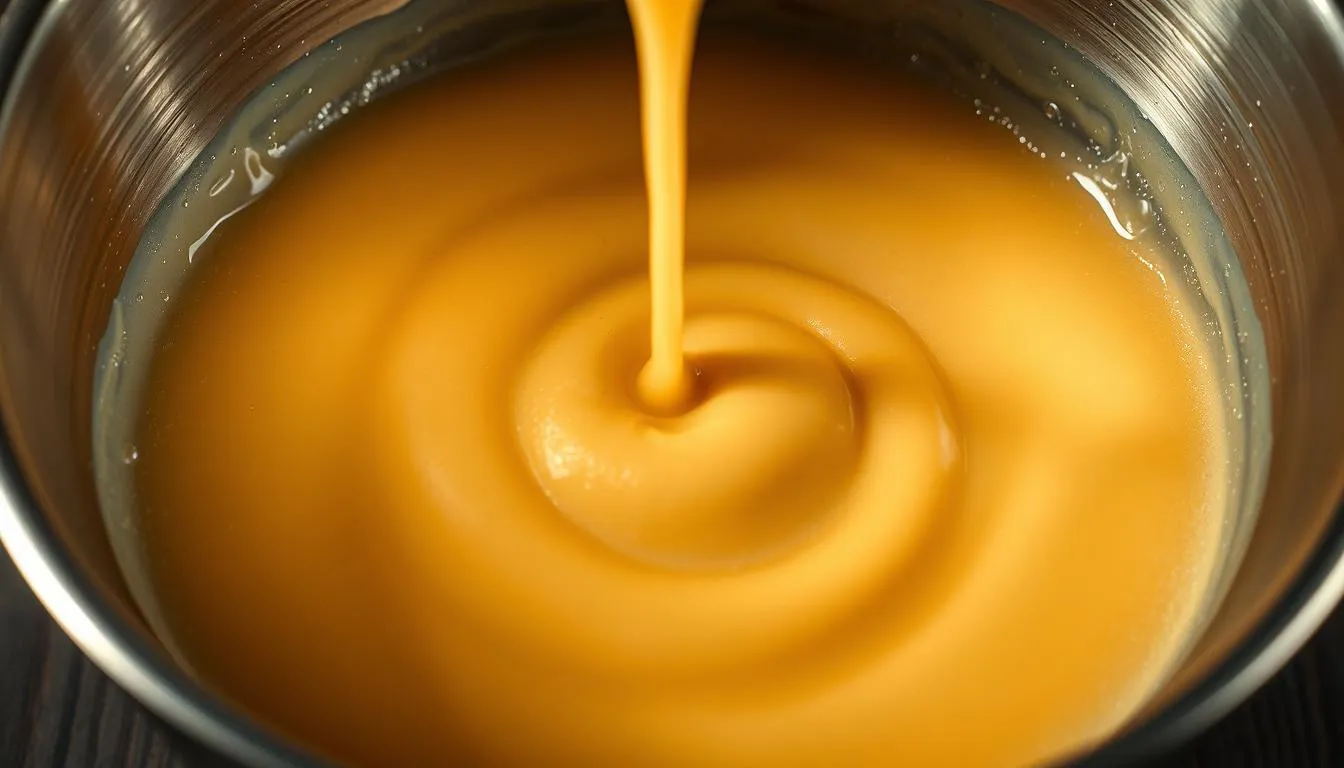
Takoyaki Batter Fundamentals: Dashi-Rich, Ultra-Pourable, Flavor-Forward
A great batter starts with savory stock, a light touch of soy, and eggs whisked to a silk-thin pour.
Core idea: Use dashi as the flavor backbone, eggs to bind, flour for structure, and a small amount of baking powder for lift. A touch of soy sauce deepens color and umami without masking the stock.
Compare flours: all-purpose offers reliable structure. Cake flour gives a tender crumb. Adding rice flour (20–30%) helps crisp edges and reduces sogginess after cooking.
- Whisk instant dashi granules into lukewarm water in a bowl, then add eggs and soy.
- Combine flour and baking powder in a separate bowl.
- Slowly stream dry mix into the wet while whisking until the batter is lump-free and thinner than pancake batter.
Pro tips: Strain the batter for a silky finish and transfer it to a spouted cup for easy pour batter control. Keep the mix cool so eggs don’t begin to set prematurely.
“A thin, pourable batter sets fast, creating a crisp shell and a moist, custardy center.”
| Component | Role | Tip |
|---|---|---|
| Dashi | Umami base | Use instant granules for speed |
| Flour | Structure | All-purpose for balance; cake or rice mix for texture |
| Eggs & baking powder | Bind and lift | Keep batter thin; don’t overmix |
- Make a test cavity first to confirm seasoning and thickness.
- Homemade batter avoids preservatives and gives you control over salt and texture.
Classic Fillings and Toppings: Octopus, Pickled Ginger, Green Onions, and More
A great filling list turns a simple batter into a chorus of textures and bright flavors.
Use pre-cooked octopus cut into bite-size pieces so each mouthful is tender and easy to chew. Keep pieces uniform so the rounds cook evenly and flip without tearing.
Core interior ingredients
Traditional fillings include tenkasu for crunchy contrast, pickled red ginger (beni shoga) for bright ginger heat, and green onions for fresh bite. Scatter ginger and green onions after the initial pour so they sit near the surface and infuse the center as it cooks.
Finishing toppings
Brush a generous layer of takoyaki sauce, then add ribbons of Kewpie mayonnaise. Dust with aonori seaweed and finish with bonito flakes that flutter from the steam for the classic visual and smoky umami.
“Kewpie’s Japanese mayo is noticeably eggier and slightly sweeter—perfect for finishing.”
| Item | Role | Tip |
|---|---|---|
| Pre-cooked octopus | Protein, chew | Cut small; warm before adding |
| Tenkasu | Crunch inside | Add a few per cavity, not too many |
| Beni shoga & green onions | Brightness | Scatter after pour to set near surface |
| Takoyaki sauce, mayonnaise, aonori, bonito flakes | Topping layers | Prep bowls nearby for quick assembly |
Pro tip: Source these ingredients at local Asian markets or reliable online grocers in the U.S. Stage toppings in small bowls so you can finish hot, fast, and evenly.
Step-by-Step: How to Make Takoyaki Octopus Balls at Home
Follow a clear rhythm and a few simple cues to get even, golden rounds.
Start with the pan heated to medium and oil each cavity well. Pour batter to about 80% full so there’s room for fillings and rise. Wait for light bubbling before adding pieces and mix-ins.

Timing and turning
When small bubbles form, add octopus, tenkasu, green onion, and pickled ginger to each well. Use a skewer to turn each one a quarter turn. This exposes raw batter to the heat and helps shape a round.
Shaping and heat control
Fold overflow back into the cavity as you rotate. Continue turning in stages over several minutes until shells are uniformly golden and slightly crisp. Move the pan or swap positions to even out hot spots.
- Preheat pan to medium; brush oil across cavities.
- Pour batter ~80% full; add fillings when bubbling starts.
- Turn in quarters, then again, folding edges to form a ball.
- Adjust heat and rotate the pan to avoid scorching.
- Serve hot and top immediately for best contrast of texture.
| Step | Visual cue | Minutes |
|---|---|---|
| Preheat & oil | Light shimmer on pan; oil beads | 1–2 |
| Pour & add fillings | Small bubbles on surface | 1–2 |
| Quarter turns & shape | Edges lift; overflow tucks in | 4–6 |
| Finish & brown | Even golden shell; slight bounce | 2–3 |
“Keep batches moving so each set finishes hot and tender.”
Sauce Secrets: Takoyaki Sauce, Soy Sauce Twists, and Kewpie Patterns
A bright, glossy sauce can turn a simple snack into a crowd-stopping plate.
Quick house blend: Whisk Worcestershire, soy sauce or tsuyu, ketchup, and honey until smooth and glossy. This takoyaki sauce is sweet, tangy, and layered with umami from the Worcestershire and dashi-rich tsuyu if you choose it.
Simple alternate finishes
For an old-school twist, brush each piece lightly with soy sauce only. Use less than you think—soy is salty and can overpower the delicate crust.
Drizzle and garnish like a pro
Pipe Kewpie mayonnaise in a neat crosshatch over the warm sauce to create that izakaya look. Sprinkle aonori seaweed and scatter bonito flakes that flutter from the heat.
- Keep sauce warm so it brushes on without tearing the shell.
- Stage toppings near the pan and sauce first, then mayonnaise, then seaweed and flakes to keep the top neat and vivid.
- Taste and adjust: more honey for sweetness, extra Worcestershire for tang, or swap in tsuyu for extra dashi depth.
“Smart saucing elevates simple fillings and delivers the full street-style experience at home.”
Popular Variations: From Shrimp and Squid to Cheese and Kimchi
You can keep the batter and method, then swap the center for shrimp, cheese, or kimchi to change the whole bite.
Seafood swaps: Shrimp or squid give a similar briny lift, while fish cake (chikuwa or imitation crab) and canned tuna are pantry-friendly choices. Precook larger seafood so each piece is tender before it goes into the pan.
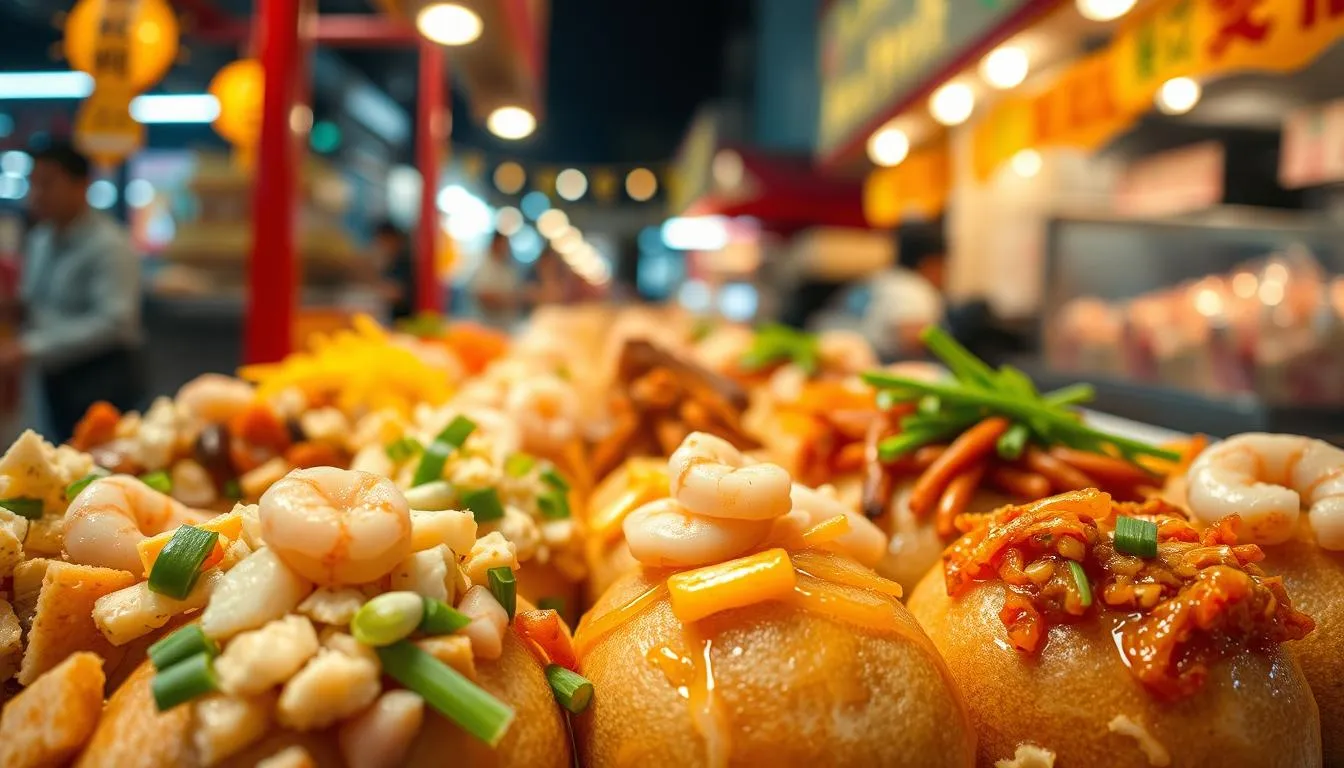 Comfort combos: Try cheddar or mozzarella for melty comfort, corn-and-cheese for kid appeal, or mochi with mentaiko for a stretchy, umami-rich surprise. These options shine when fillings are cut small so they fit and distribute evenly.
Meaty and plant-forward ideas: Small bits of sausage, rendered pork belly, or browned chicken add heft—render excess fat first to avoid greasy centers. For a vegetarian spin, sautéed mushrooms or spicy kimchi wake up the soft interior.
- Keep add-ins small and uniform so the rounds stay cohesive.
- Pre-cook anything that needs extra time; the pan cooks fast—often in just a few minutes.
- Mix and match within a single batch for a tasting-board approach.
“A quick brush of sauce and a drizzle of mayo helps diverse fillings feel like one cohesive platter.”
| Category | Examples | Tip |
|---|---|---|
| Seafood | Shrimp, squid, fish cake, tuna | Pre-cook and cut small |
| Comfort | Cheese, corn & cheese, mochi + mentaiko | Use melt-friendly cheeses; keep stuffing light |
| Meat & Plant | Sausage, chicken, mushrooms, kimchi | Render or sauté to control fat and moisture |
Label variations on the serving board so guests know heat levels and ingredients. For a full method if you want to try many combos, see this takoyaki recipe for timing and basic technique.
Timing, Doneness, and Texture: Minutes to Crispy-Golden Perfection
Mastering minutes at the pan helps you coax a crisp shell and a warm, custardy interior.
Start by watching for small bubbles after the initial pour; that’s your cue to wait a few minutes before the first turns. Rotate each ball in stages every few minutes so the round shape develops and the color evens out.
Use visual cues over the clock: edges pulling away and a gentle spring mean the shell is set and ready to flip. Swap paler and darker pieces to balance hot spots across the pan.
If the crust looks dry during later turns, add a light brush of oil to refresh the sizzle without soaking the centers. For a precise check, many home cooks target about 200°F internal temperature while keeping the core slightly gooey for authentic texture.
- First set: a few minutes to bubble and set, then short turns to shape.
- Keep heat steady so the exterior crisps as the interior sets—too hot scorches, too cool prevents shape.
- Denser or cold fillings add a minute or two; flip gently to avoid tearing the shell.
“Finish when pieces are uniformly golden, lightly crisp outside, and still soft and steamy within.”
Accept that the inside should remain custardy, not dry. The right balance of minutes, steady flipping, and small oil touches gives you fried octopus balls with the classic contrast everyone seeks.
Leftovers, Storage, and Reheating Without Soggy Results
Treat leftovers like fragile pastries: cool fully, seal airtight, and reheat gently for best texture.
Short- and long-term storage: Cool cooked pieces completely before packing. Store without any sauce or mayo in an airtight container. Refrigerate for up to 3 days or freeze for 2–3 weeks to preserve the crisp shell and avoid added fat from toppings.
Best reheating methods
- Oven at 350°F (180°C): 8–10 minutes if thawed, 12–15 minutes from frozen to return a pleasant crisp outer layer.
- Air fryer at 350°F: 5–8 minutes for fast, even re-crisping.
- Pan: Add a light film of oil and reheat, turning until shells regain color and centers are hot.
Avoid microwave-only reheating; it makes the shell soggy and heats unevenly. If you must microwave, zap briefly then finish in the oven or pan.
Serving and safety: Add sauce and mayonnaise only after reheating so the exterior stays crisp. Let each piece rest a minute before biting—centers trap steam and can be very hot.
For step-by-step how to reheat takoyaki and timing instructions, follow this quick guide so every batch tastes close to fresh.
Serving Ideas and Pairings: Street Food-Style at Home
Build a lively, shareable spread so guests can graze and compare flavors straight from the griddle.
Keep the menu simple and complementary. Offer izakaya favorites—skewers of yakitori, crisp tempura, and a bowl of miso soup—to round out the main snack. A cold beer or a light, crisp beverage pairs perfectly with the savory batter and rich toppings.
Set up a toppings bar with the essentials: takoyaki sauce, Kewpie mayonnaise, aonori seaweed, and a generous bowl of bonito flakes. Let guests top as they like so each plate feels personal and fresh.
- Offer garnish upgrades: shredded kizami nori, extra green onions, and ponzu with grated daikon for a bright counterpoint.
- Present a soy-sauce brushed option beside the classic sauced version so guests can compare flavors.
- Serve straight from the pan to the table to keep the street food energy—watch the bonito flakes and sauce dance on the hot surface.
Practical tips: Arrange small bowls, squeeze bottles, and spoons for neat assembly. Provide toothpicks or skewers and wooden trays to complete the stall-style vibe and make snacking easy.
“A casual, interactive setup makes every bite feel like a little festival.”
Conclusion
Once you lock in batter texture and turning timing, the rest becomes playful experimentation.
Master the basics—dashi-rich batter, a well-heated pan, steady flips, and classic toppings—and you can recreate Osaka-style takoyaki octopus balls at home.
Start with the classic recipe to learn rhythm, then try seafood, cheesy, or spicy variations. Use pre-cooked, bite-size pieces and thoughtful fillings so each ball cooks evenly.
Timing and heat control are your keys. Brush on the quick sauce from the sauce section, add a Kewpie crosshatch, and serve hot for best texture.
Keep Worcestershire, soy or tsuyu, ketchup, honey, and Kewpie on hand. Store and reheat gently so leftovers stay crisp. Share your tweaks—every home develops a favorite recipe and a fun ritual to make takoyaki part of regular gatherings.
FAQ
What exactly are takoyaki octopus balls and where did they come from?
These are small, round Japanese snacks made from a thin, savory batter filled with diced octopus, pickled ginger, and green onion. They originated in Osaka in the 1930s and were influenced by akashiyaki, a softer egg-based dumpling. Today you’ll find them at street stalls, restaurants, and convenience stores across Japan and worldwide.
What pan do I need to make them at home?
Use a dedicated molded pan—electric or stovetop cast-iron. Electric pans offer consistent heat and easy clean-up; cast-iron gives high heat and browning control. An aebleskiver pan can work with size and timing tweaks. For U.S. buyers, check voltage for imported electrics and shop at cookware stores or online retailers like Williams Sonoma or Amazon.
What’s the key to a batter that’s pourable yet yields a crispy shell and gooey center?
Make a dashi-rich thin batter using dashi stock, flour, eggs, and a touch of soy sauce. Use all-purpose or a blend with cake or rice flour to balance crispness and tenderness. Whisk until lump-free and strain if needed for an ultra-smooth, pourable texture.
How should I prepare the filling to ensure easy chewing and good texture?
Use pre-cooked, firm bite-size pieces so they stay tender in the hot batter. Add small cubes of octopus, tempura scraps (tenkasu) for crunch, pickled ginger (beni shoga) for brightness, and sliced scallions for freshness.
When should I add fillings during cooking to avoid sinking or burning?
Pour batter to about eighty percent full, then wait until surface bubbles appear. Add fillings at that stage so they sink into the batter without dragging down the whole ball or charring on the surface.
What’s the flipping technique for perfectly round results?
Once the bottom sets and edges start to brown, use skewers to rotate each piece a quarter-turn, folding overflow batter into the hole. Continue turning as the batter cooks to form a tight, even sphere. Move the pan or swap positions to maintain even heat.
What sauce and toppings are traditional and how can I make a quick homemade sauce?
Top with a tangy brown sauce, Kewpie mayonnaise in a crosshatch pattern, aonori seaweed, and bonito flakes. For a simple homemade sauce, mix Worcestershire, ketchup, soy or tsuyu, and a little honey to taste.
Can I make variations for dietary needs or flavor preferences?
Yes—swap seafood for shrimp, squid, fish cake, or tuna. Try cheese, corn, mochi, kimchi, or plant-based proteins like mushrooms or seasoned tofu. Sausage and chicken also work for meat-forward versions.
How long does it take to cook them to a crispy-golden finish?
Expect several minutes per batch: preheat, pour, and about 6–10 minutes of active cooking while turning to achieve a crispy exterior and molten interior. Exact time depends on pan heat and size.
What’s the best way to store and reheat leftovers without getting soggy?
Store cooled pieces without toppings in an airtight container. Refrigerate for a few days or freeze for longer storage. Reheat in a 350°F oven, an air fryer, or a hot pan to restore crispness—avoid the microwave alone.
What should I serve alongside for a street-food-style meal at home?
Pair with yakitori, tempura, miso soup, or a chilled beer. Garnish with extra green onions, kizami nori, ponzu, or grated daikon for added brightness and texture.