Learn About Taiyaki Fish Cake, a Popular Japanese Street Food
Learn about taiyaki fish cake, a Japanese street food favorite. Our recipe guide makes it easy to create this sweet and crispy treat in the comfort of your own home.
13 min read
I still remember the warm steam and the first bite — a crispy edge giving way to a tender, sweet center. That moment taught me how a simple street snack can carry memory, culture, and comfort all at once.
This guide introduces a beloved festival snack shaped like a sea bream, traditionally filled with anko (sweet red bean paste), and sold at matsuri across Japan.
You’ll get a friendly, step-by-step approach tailored for home cooks in the U.S. We cover tools, ingredients, timing, and why batter choices affect the final texture.
The pan does the sculpting, but technique matters: preheat to about 285°F (140°C), cook 2–3 minutes per side, and cool briefly for crisp edges and a soft center.
We’ll explore classic and modern fillings, cultural meaning behind the shape, and ways to store and reheat so your treat stays great later. For more history and detail, see this short overview on taiyaki.
Key Takeaways
- Learn the basics of this popular Japanese street food and its sea bream shape.
- Follow a clear recipe path from batter to filling to pan technique.
- Preheat the pan to ~285°F (140°C) and time 2–3 minutes per side for best texture.
- Discover classic anko filling plus easy modern variations for U.S. kitchens.
- We explain storage and reheating so snacks stay crisp outside, tender inside.
- Beginner-friendly steps and cultural notes on matsuri and good-luck symbolism.
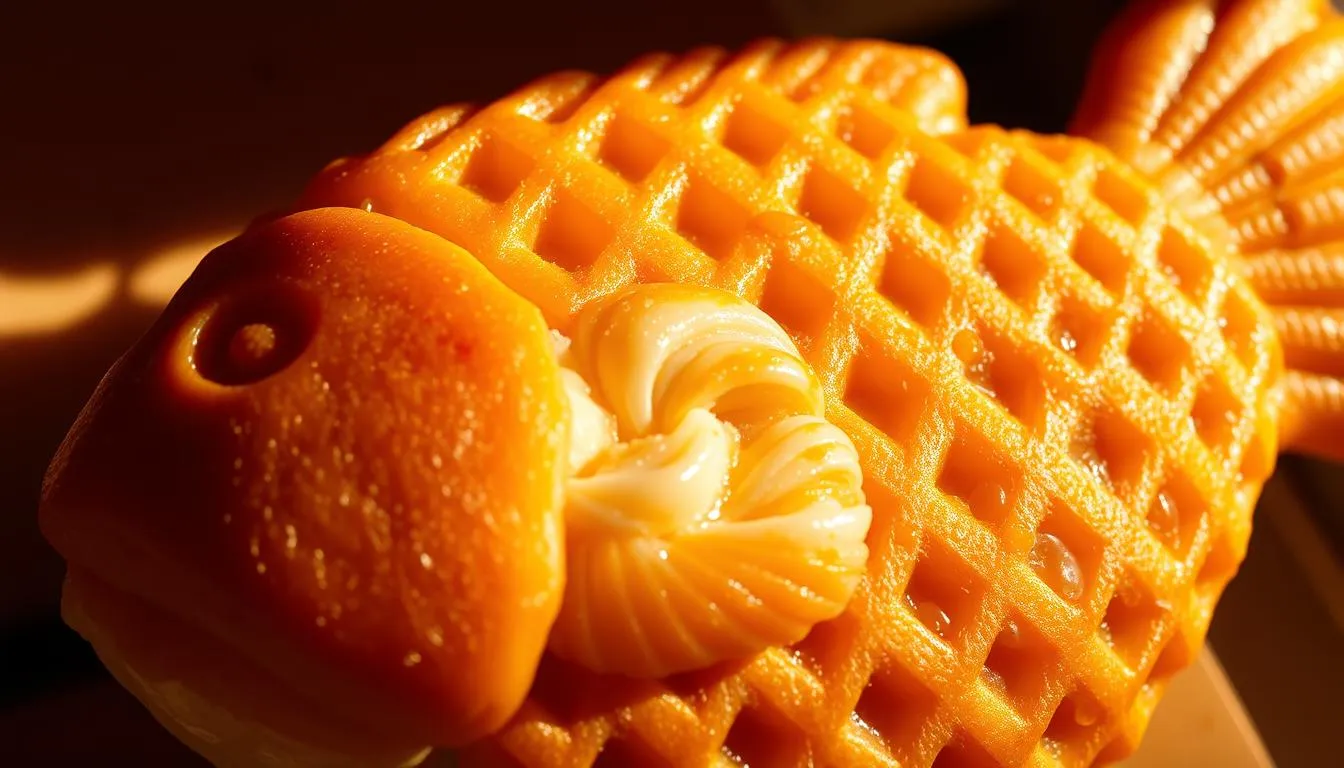
What Is Taiyaki? The Fish-Shaped Japanese Street Food Icon
Born from Edo-period round pastries, this iconic mold turned a familiar filled sweet into a symbolic delight.
Name and meaning: The word literally breaks down to sea bream (tai) and grilled/baked (yaki). The sea bream shape stands for luck and celebration across Japan, so the snack often appears at matsuri and neighborhood stalls.

How it compares to imagawayaki
- Shape: a sculpted fish profile versus the round imagawayaki.
- Texture: batter can be crisp and waffle-like or soft and cakey depending on technique.
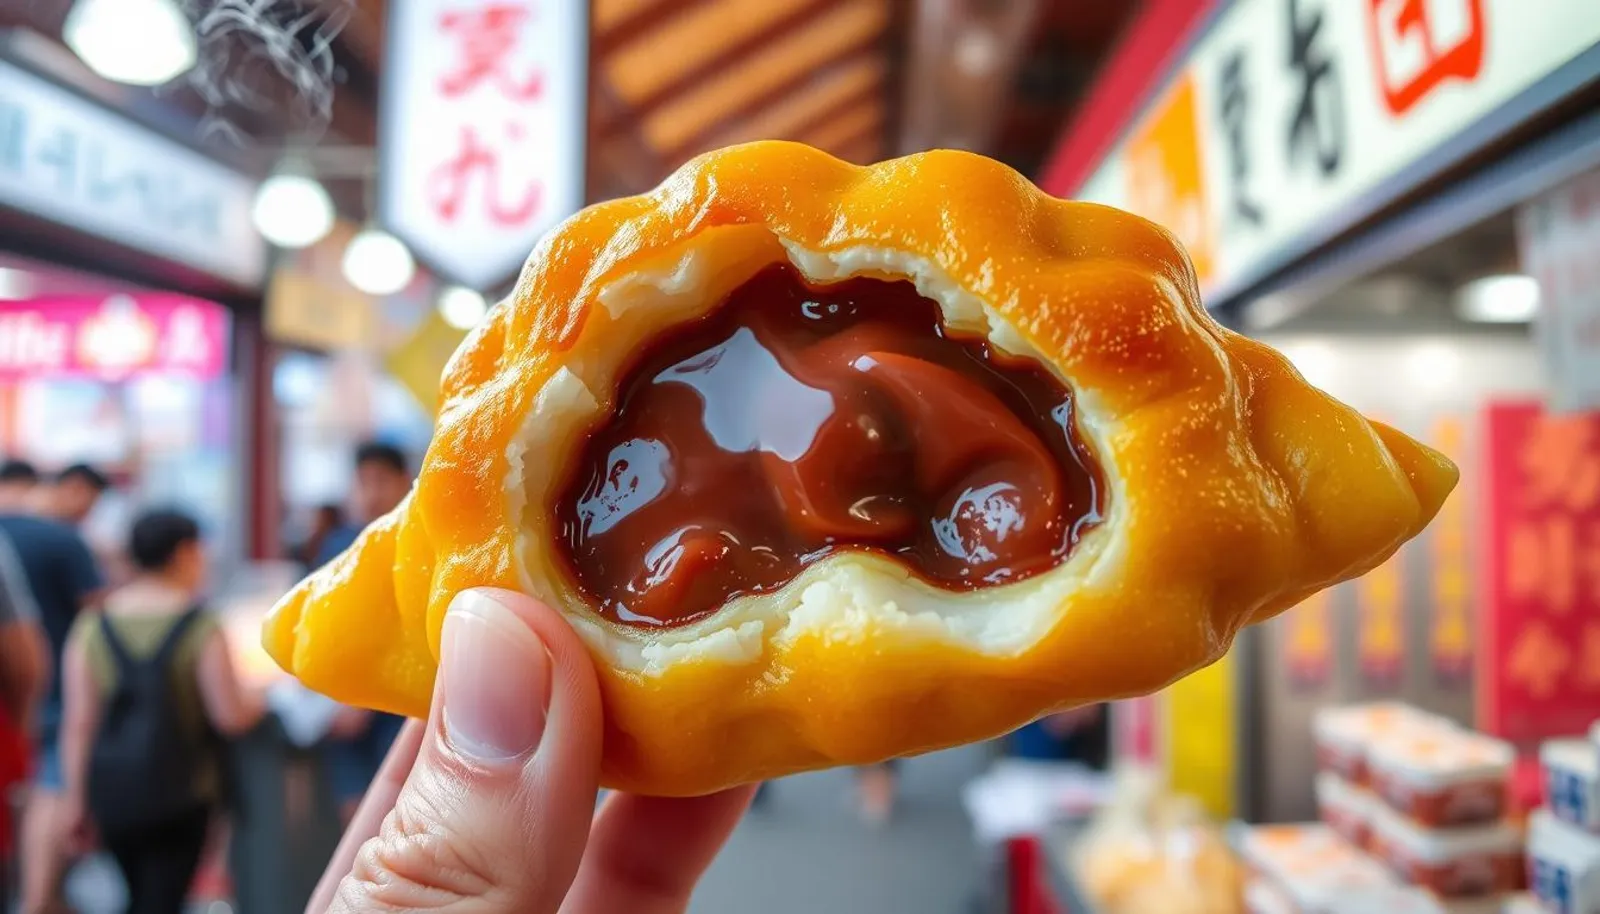
- Filling: classic anko red bean paste (tsubuan or koshian), but modern shops use custard, chocolate, and more.
| Feature | Shaped Version | Imagawayaki |
|---|---|---|
| Shape | Detailed sea bream profile | Round |
| Classic filling | Anko (bean paste) | Anko (bean paste) |
| Texture | Crisp edges or cakey center | Uniform cakey interior |
Pronunciation tip: say it like “Tie-yah-key.” Try both versions to find the batter and filling balance you prefer.
Taiyaki Fish Cake: Origins, Styles, and Why It’s Beloved Today
What began as a simple round pastry in Edo evolved into a molded specialty that dominates festival stalls.
History and heart: The treat grew from imagawayaki in the Edo era and took its modern form in Tokyo around 1909 at Naniwaya Sōhonten. The sea bream motif mattered—bream links to prosperity—so vendors served it at matsuri and community events.
Two signature textures: Tennenmono uses single cast-iron molds for an ultra-crisp, waffle-like shell. Renshiki uses multi-mold plates to make a cakey, fluffy interior with a lightly crisp edge.
| Style | Tool | Result |
|---|---|---|
| Tennenmono | Single cast-iron mold | Extra crisp shell, thin profile |
| Renshiki | Multi-cavity plate | Fluffy interior, faster output |
| Fillings | Traditional & modern | Anko, custard, chocolate |
Portability made it a perfect japanese street snack at festivals and markets. Taste both styles and you’ll see how batter, mold material, and heat change the final texture and bite.
Tools You’ll Need: Taiyaki Pan, Heat, and Handy Accessories
Getting the heat and tools right is the fastest way to better texture and clean shapes.
Choose the right pan: A dedicated taiyaki pan matters. Single cast-iron molds give crisper shells. Multi-mold plates let you cook more at once and yield a cakier interior.
Must-have small tools
- Thermometer: An IR gun or probe helps you reach about 285°F (140°C) on both sides of the pan. Stable low heat beats a hot, uneven burner.
- Grease and release: Lightly coat molds with an oil-soaked paper towel, working into fins and tail without leaving pools that cause uneven browning.
- Finishing tools: Use a heat-safe pastry brush, a toothpick or skewer for gentle release, and a wire rack to cool so crusts stay crisp.
Note that batter with a bit of fat and honey releases more easily, but a quick re-grease between rounds still helps when fillings leak. Test your stove’s low setting and handle cast iron carefully—it holds heat for a long time.
Ingredients for Classic Taiyaki Batter and Filling
A reliable batter starts with the right flours and a simple ratio that balances crisp and chew. Use a 3:1 ratio of cake flour to glutinous rice flour (shiratamako) to create a light, crisp exterior with a slight mochi-like bite.
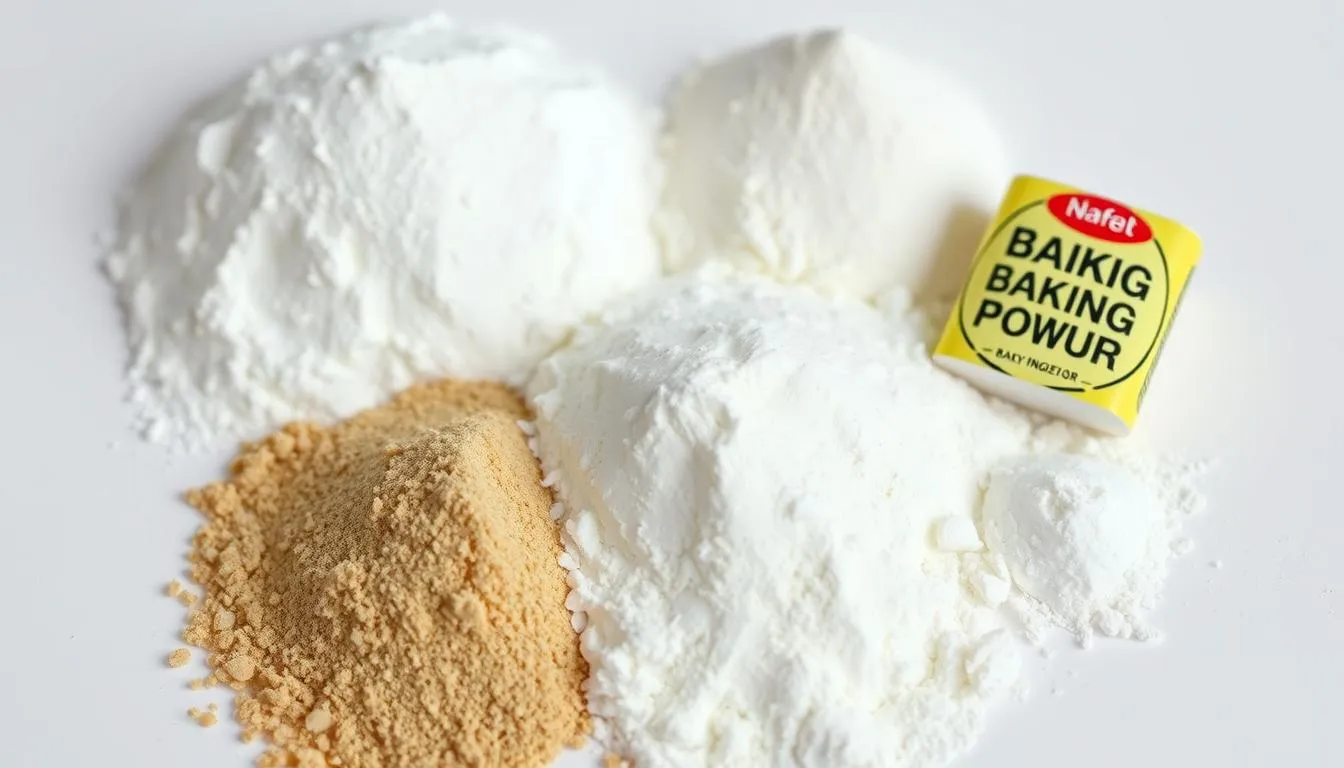
Leavening and color
Baking powder gives lift; add a pinch of baking soda to raise pH and promote a golden crust. This small tweak improves browning without changing texture.
Liquid, fat, and flavor
Choose whole or 2% milk for richer flavor. Melted butter adds moisture and helps the batter release from the mold.
Sweeten with honey for better caramelization; you can swap sugar but expect less color. Stir in a splash of vanilla to brighten aroma.
Classic and alternative fillings
Traditional anko comes as chunky tsubuan or smooth koshian. Both pair well with the delicate shell.
- Custard cream or pastry cream
- Chocolate spread or ganache
- Peanut butter (try banana or chips)
- Matcha-scented batter or filling
Weigh ingredients for consistent batter thickness. Aim for a smooth, pourable mix that spreads quickly but holds a centered filling. Pre-shape your red bean paste ovals so you can assemble fast and avoid overfilling.
For more filling ideas and recipes, see this concise guide on classic and modern fillings.
Texture Science: Getting Crispy Edges and a Tender, Chewy Center
Crisp edges and a tender interior come from small, repeatable choices in flour, rest, and heat.
Start with cake flour. Its low protein keeps the shell light and crisp. Overmixing the batter activates gluten and makes the interior tough. Mix only until smooth.
Why cake flour and gentle mixing matter
Favor cake flour to reduce gluten. Use a soft hand when stirring. Rest the batter up to one hour to relax any tight gluten strands.
Alkalinity and even browning
A small pinch of baking soda raises pH so Maillard browning happens. Add honey to help color, but mix thoroughly so leaveners and sweeteners distribute evenly.
Heat, rest, and fat balance
Preheat the pan to about 285°F (140°C). Steady heat sets the outer surface and creates crisp edges. Balance fat: butter adds flavor but too much will weigh down the structure.
“Control the heat and rest your batter; chemistry does the heavy lifting for consistent color and crunch.”
| Factor | Why it matters | Quick tip |
|---|---|---|
| Flour | Cake flour limits gluten | Weigh for consistency |
| Leaveners | Even lift and browning | Mix leaveners into dry first |
| Fat | Tenderness vs. crispness | Use moderate butter |
| Heat | Sets crust and color | Preheat to ~285°F |
Step-by-Step: How to Make Taiyaki at Home
Get your pan ready and work in small batches — this keeps heat steady and results consistent.
Prep the pan: Preheat both halves of the taiyaki pan on the lowest stove setting until the surface reaches about 285°F (140°C). Lightly grease the molds using an oil-soaked paper towel, working oil into fins and tail without leaving bubbles.
Layering technique
Add roughly one tablespoon of batter to each mold half. Brush batter into the tail, fins, and up the sides to form a thin shell.
Pre-shape a heaping tablespoon of anko or red bean paste into an oval and place it in the center, leaving a ½-inch border. Cover with a little more batter so the filling is sealed.
Flip timing and heat control
Close and lock the pan, flip it, and cook for about 2–3 minutes per side. Peek after the first side to confirm a uniform golden hue and cook longer if needed.
Release, trim, and serve
Use a skewer to ease the edges if anything sticks. Transfer finished pieces to a wire rack so steam escapes and the crust stays crisp. Trim excess edges if you prefer a tidy look.
“Work in small batches at first — it helps you dial in exact minutes per side and avoid overcooking.”
- Keep batter thick but pourable; too thin and the filling will leak, too thick and it won’t reach the tail.
- If parts stick, reheat that side briefly and loosen gently with a toothpick or skewer.
- For a full recipe and ingredient ratios, consult this detailed recipe.
Troubleshooting and Pro Tips
Small adjustments to heat, grease, and batter will fix most home cooking problems fast.
Pale shells, sticking, and uneven browning
Check pan temperature: Aim for about 285°F (140°C). Too-low heat yields pale crusts and long bake times.
Fresh leaveners matter: Baking powder or a pinch of baking soda must be fresh for good color and lift.
Leaking or “exploding” red bean paste and overfilling
Leave a clear border around the filling and fully cover the anko before closing the mold.
Cook about 2–3 minutes per side; excessively low heat lets the dense red bean paste overheat and burst.
Consistency cues: paste-like batter vs. too runny or thick
Keep the batter thick but pourable so it fills details without running. Too thin and the filling slips out; too thick and the texture turns dense.
For bean paste handling, pre-shape portions and avoid overpacking the cavity.
- If parts stick, grease fins and tail well with an oiled towel; avoid oil pools.
- Wipe burnt residue between rounds and calibrate minutes per side for your stove.
- Rest batter up to an hour and don’t overmix to preserve tender texture.
“Tidy prep and steady heat beat guesswork—once you find the right minutes and feel, repeat it.”
Serving, Storage, and Reheating
Serve warm for the best contrast between a crisp exterior and a tender, sweet red bean center. Let each piece cool on a wire rack for a few minutes so steam can escape and the underside does not get soggy.
Quick serving tips
Best eaten hot: These snacks shine fresh from the pan. Offer them within minutes of cooking for peak texture.
Storage guidelines
Wrap leftovers individually and refrigerate for up to 2–3 days. For longer storage, freeze portions for up to one month and label by filling so you can grab the flavor you want.
Reheating methods
Re-crisp in a 350°F (180°C) oven or toaster oven until the shell feels crisp again. This method preserves the pastry texture best.
For quick warming, briefly heat in the original taiyaki pan over low heat, or use a short microwave burst only to take the chill off—then finish in the oven if you want crispness.
“Cool on a rack to keep the underside from steaming soft; reheat in the oven for a crunchy shell.”
- Thinner shells re-crisp faster; cakier versions may need an extra minute or two.
- Label frozen cups by filling to save time when choosing a snack later.
- Careful sealing during assembly prevents leaks during reheating and storage.
Conclusion
Mastering the pan and batter unlocks the best balance of crisp edge and tender center.
Keep the basics: use cake flour, a pinch of baking soda for browning, and small amounts of milk, butter, honey, and vanilla in your batter. Preheat the pan to about 285°F (140°C) and cook each side 2–3 minutes for an even golden texture and well-set shape.
Choose classic anko or try custard, chocolate, peanut butter, or matcha for the filling. Shape portions of red bean paste so sealing is fast and leaks are rare. Cool on a wire rack and reheat in a 350°F oven to restore crispness.
Use this taiyaki recipe as a starter guide. With steady technique and the right ingredients, you’ll nail the texture and share a warm, street-style snack with family and friends.
FAQ
What is the traditional filling used in this Japanese street snack?
The classic filling is sweet red bean paste (anko). It comes as tsubuan (chunky) or koshian (smooth). Both pair well with a slightly sweet, pancake-like batter for a balanced texture and taste.
Can I make the batter with regular all-purpose flour instead of cake flour?
Yes, but cake flour gives a lighter, tender interior. If you use all-purpose flour, reduce mixing and consider adding a teaspoon of baking powder to mimic the softer crumb.
What tools do I need to cook this at home?
The essential tool is a multi-mold or single cast-iron pan made for the molded pastry. Also keep a thermometer, pastry brush, wooden skewer, and neutral oil on hand for even heating and clean release.
How do I prevent the filling from leaking during cooking?
Use a centered, measured dollop of filling and spread a thin batter layer around it. Avoid overfilling, press the edges gently when closing the mold, and keep pan temperature steady to prevent rapid expansion of filling.
What temperature should the pan reach before pouring batter?
Heat both sides of the pan until about 285°F (140°C) for even browning. A preheated pan gives crisp edges while allowing the center to cook through without burning.
How long does each side need to cook, and when should I flip?
Cook about 2–3 minutes per side over medium heat. Flip once the surface shows golden color and edges begin to set; flipping helps achieve uniform color and crispness.
Are there popular alternative fillings besides red bean paste?
Yes. Custard cream, chocolate, peanut butter, matcha paste, and sweet potato are common modern choices. Many vendors also offer seasonal or savory fillings for variety.
What causes pale shells or uneven browning, and how do I fix it?
Pale shells come from low pan temperature or too-wet batter. Raise heat slightly, rest the batter briefly, and avoid overmixing. Check that the pan contacts heat evenly and oil coverage is light and uniform.
How should I store leftovers and reheat them to keep crisp edges?
Cool on a wire rack, then refrigerate for up to 2 days or freeze for longer. Reheat in a toaster oven or conventional oven at 350°F until crisp—avoid microwaves, which often make them soggy.
Can I make the batter ahead of time and refrigerate it?
Yes. Resting the batter for 30 minutes to an hour improves texture. Store covered in the fridge up to 24 hours; bring it closer to room temperature before using for best results.
How do I achieve both a crispy edge and a tender center?
Use cake flour, avoid overmixing, and control pan temperature. A slightly higher heat at the start forms crisp edges, then lower the heat to allow the center to cook through without drying out.
Is it possible to make a gluten-free version?
Yes. Use a gluten-free flour blend formulated for baking and add a binder like xanthan gum if not included. Test small batches to fine-tune batter thickness and cook times.